
Thursday, November 21, 2019
Thursday, September 26, 2019
Cinnamon Baked Apple Yogurt
"It's late September and I really should be BACK in school!" - Apologies to Rod Stewart - but it's 91 degrees and my AC is out. I called Fall and asked "Where ARE you?!?"

Cook's Notes:
Fall said he had to stop and pickup Summer. "I'll be there shortly, Summer is passed out drunk in my back seat and smells like Pumpkin Spice."
So.. It's Fall but it's too hot in the kitchen to cook.. What Oh What can I have or breakfast?
Hmm.. What have I got?? Apples from the orchard.. a little spice... And My breakfast staple Greek yogurt.. Aught to work!!
Cinnamon Baked Apple Greek Yogurt Parfait
Ingredients:
1 small to medium apple - cored and chopped in 1/2 inch pieces
1/4 tsp cinnamon
1 Tbsp water
1 Tbsp butter
Drizzle of molasses
8 oz Whole fat Greek Yogurt
1 - 2 oz Heavy Cream - optional
1 Tbsp chopped Walnuts
1 Tbsp chopped Walnuts
Sweetener of choice to taste - optional

Instructions:
- Chop apple into microwave safe cereal bowl
- Add cinnamon, water, butter and drizzle of molasses
- Microwave for 3 minutes on HIGH
- Stir well
- In a separate bowl spoon up yogurt
- Top with some cooked apple mixture
- Sprinkle with chopped nuts
- Pour on Optional heavy cream and add sweetener as desired
- Stir - Smile... "Hello Fall"
Cook's Notes:
- For most bariatric patients this will make about 3 - 1/2 cup servings. Keeps well in the refrigerator
- Don't freak at the "molasses" - it's a miniscule amount and adds the missing "brown sugar" taste component to the dish
- I use Heavy Cream.. I LIKE Heavy Cream. You can use whatever you please to thin the Greek yogurt a bit - you can even use REGULAR yogurt - I just never have any in my house...
Wednesday, June 19, 2019
Pureed Chicken Salad

Today I'm feeling sorry for those poor patients who are just barely post-surgery and looking DESPERATELY for some foods they can stomach in the upcoming pureed stage. NOBODY wants to eat those little jars of baby food, so I usually recommend looking at the foods you like and running them thru a blender or food processor.
This version of chicken salad is tasty and simple. A single 8 oz chicken breast will make about 4 bariatric pureed sized servings, so you can space this around some other foods for a variety. We're going to stay away from the onions and celery because of the fiber in them that won't break down when processed - BUT we still have the flavor. Be sure to check the Cook's Notes at the bottom for ideas.
Ingredients
1 chicken breast, cooked
4 Tablespoons Good Mayonnaise
1/8 teaspoon celery salt
1/8 teaspoon onion powder
pinch of black pepper
Instructions
Cook and cube chicken breast
1 chicken breast, cooked
4 Tablespoons Good Mayonnaise
1/8 teaspoon celery salt
1/8 teaspoon onion powder
pinch of black pepper
Instructions
Cook and cube chicken breast
Place chicken into a food processor.
Grind chicken until it is a fine consistency.
Stir in yogurt, mayonnaise, celery salt, onion powder, and pepper.
Grind chicken until it is a fine consistency.
Stir in yogurt, mayonnaise, celery salt, onion powder, and pepper.
Cook's Notes:
- Chicken breast can be dry if it is improperly cooked, so feel free to substitute boneless, skinless thighs.
- You can prepare the chicken any way you like. I usually steam or roast mine, but pan searing and boiling are also acceptable. Use whatever method you prefer.
- GOOD mayonnaise has no sugar in it, be sure to read the label. Duke's brand is available here in the South and it is QUITE delicious.
- To control the fat content you can substitute Greek Yogurt for half of the mayonnaise
Tuesday, May 21, 2019
Ricotta Bake
My wife LOVES Italian food, PARTICULARLY pasta - and a big plate of lasagna sends her into ecstasy. So she was tickled when I discovered this dish, which was originally built in a casserole, for a dinner she and I could enjoy together. Now I find it MUCH more convenient to divide the portions into a non-stick muffin tin to make it easier for me to keep track of portion sizes
One of the secrets for post-bariatric success is to prepare dishes that can be enjoyed by your family and still meet your nutritional needs. This is certainly one of them. I still prepare it 9 years out and add a bit of meat crumbles in the sauce.
Ingredients:
8 oz good ricotta cheese
1/2 cup grated Parmesan cheese
1 large egg, beaten
Italian seasoning to taste
salt and pepper to taste
11 tablespoons No-Sugar-Added Pizza/Pasta Sauce
1 to 1.5 cups shredded mozzarella and provolone cheese
Instructions:
Preheat oven to 450 degrees.
Lightly grease (Pam is fine) 1 regular muffin tin.
Mix Ricotta, Parmesan, beaten egg and spices in bowl.
Divide mixture evenly into the muffin tin - about three tablespoons into each - ending up with eleven portions.
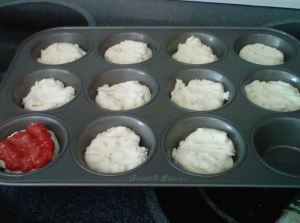
Spoon 1 tablespoon of the pizza/pasta sauce over each portion and sprinkle with the cheese. I love cheese and ended up using about 1 1/2 cups over all.

Bake at 450 degrees for 20 to 25 minutes, depending on how dark and bubbly you want the cheese.
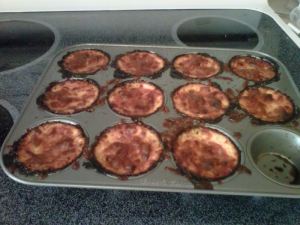
The result, quite tasty.

Spoon 1 tablespoon of the pizza/pasta sauce over each portion and sprinkle with the cheese. I love cheese and ended up using about 1 1/2 cups over all.

Bake at 450 degrees for 20 to 25 minutes, depending on how dark and bubbly you want the cheese.

The result, quite tasty.

Cook's Notes:
- As you get into solid foods, you can add meat (beef, lamb, sausage, etc..) or veggy crumbles
- For easy cleanup I recommend a silicone muffin tin instead of metal - even over metal non-stick
- Buy good ricotta.. Many cheap brands are "grainy". Personally I prefer the fresh ricotta that they make at my local Italian deli, but Trader Joe's has a nice one - or in the grocery, I pick up Polly-O
- Feel free to add a tiny pinch of cayenne to point up the heat factor
- I use crushed tomatoes with added spices as my pasta sauce, so I can control the added sugar content.
- A friend (thanks Erieka!) pointed out this would work well with pesto, spinach and pre-cooked chicken. She was RIGHT!!!
Tuesday, April 16, 2019
Meal Planning
Meal Planning: Everybody hates it, but successful people do it. And, quite honestly, after a while it just gets to the point of plugging in your choices into the grid below. This is a sample week - each day is about 1000 calories and 100 grams of protein. The dishes are real "people food" so you can serve them to your family. No supplements, all available at your local grocery... The recipes are all over the internet. A quick search will find these and many many more that you will love - IF you will just taste them.
This is a SAMPLE.. use it as an example and fill it with the foods you prefer
| Monday | Tuesday | Wednesday | Thursday | Friday | Saturday | Sunday | ||
| Breakfast | 5 oz Dannon Light and Fit Yogurt 1/3 Cup All Bran Buds 1 oz unsweetened almond milk | Mixed Berry Overnight Oats | 5 oz Dannon Light and Fit Yogurt 1/3 Cup All Bran Buds 1 oz unsweetened almond milk | Mixed Berry Overnight Oats | 5 oz Dannon Light and Fit Yogurt 1/3 Cup All Bran Buds 1 oz unsweetened almond milk | Eggs Baked in Canadian Bacon Cups 1/4 Cup Berries | Eggs Baked in Canadian Bacon Cups 1/4 Cup Berries | |
| Snack 1 | Cinnamon Vanilla Protein Energy Ball | Cinnamon Apple Oat Protein Energy Ball | Cinnamon Vanilla Protein Energy Ball | Cinnamon Apple Oat Protein Energy Ball | Cinnamon Vanilla Protein Energy Ball | Cinnamon Apple Oat Protein Energy Ball | Cinnamon Vanilla Protein Energy Ball | |
| Lunch | 4 oz Albacore Chunk White Tuna 1 Tbsp Good Mayonnaise 1 WASA Multigrain Crispbread | 1'4 Cup Chicken Bacon Swiss Salad 1 WASA Multigrain Crispbread | 4 oz Homestyle Turkey Meatloaf 1/4 Cup Savory Green Beans | 1'4 Cup Chicken Bacon Swiss Salad 1 WASA Multigrain Crispbread | 4 oz. Leftover Chicken from Wednesday 1/4 Cup Cheesy Broccoli Quinoa Casserole | 1 Serving Beefy Mexican Soup (made with 1 cup taco meat) | 1'4 Cup Chicken Bacon Swiss Salad 1 WASA Multigrain Crispbread | |
5
| Snack 2 | 1/4 Cup Berries 1 Baby Bel Light 7 slices Turkey Pepperoni | 1/2 Cup Berries 1 Serving Jack Links Turkey Jerky | 1/4 Cup Berries 1 Baby Bel Light 7 slices Turkey Pepperoni | 1/2 Cup Berries 1 Serving Jack Links Turkey Jerky | 1/4 Cup Berries 1 Baby Bel Light 7 slices Turkey Pepperoni | 1/2 Cup Berries 1 Serving Jack Links Turkey Jerky | 1 Small Gala Apple 1 Baby Bel Light |
| Dinner | 4 oz Homestyle Turkey Meatloaf 1/4 Cup Savory Green Beans | 4 oz Pork Chops w/Creamy Dijon Sauce 1/4 cup steamed Broccoli | 4 oz Baked or Grilled Chicken Breast with any Marinade 1/4 Cup Lima Beans with 1 tsp Butter | 3 oz Cajun Swordfish w/Zesty Tartar Sauce 1/4 Cup Cheesy Broccoli Quinoa Casserole | Taco Salad w/Cheddar and Salsa use 1/3 Cup Meat - reserve 1 Cup for later (Taco Soup) | 4 oz Feta Stuffed Chicken Breast 1/4 cup steamed or roasted Zucchini w/Lemon and Italian Herbs | 4 oz Baked or Grilled Chicken Breast with any Marinade 1/4 Cup Sweet Potato | |
| Snack 3 | 2 Chocolate Chocolate Chip Protein Cookies | 5 oz Dannon Light and Fit Toasted Coconut Vanilla Greek Yogurt 1 Tbsp Semi-sweet Mini-Chocolate Chips | 1 Serving Chocolate Cheesecake Protein Pudding | 5 oz Dannon Light and Fit Toasted Coconut Vanilla Greek Yogurt 1 Tbsp Semi-sweet Mini-Chocolate Chips | 1 Chocolate Chocolate Chip Protein Cookie | 5 oz Dannon Light and Fit Toasted Coconut Vanilla Greek Yogurt 1/3 Cup All Bran Buds 1 oz Unsweetened Almond Milk | 5 oz Dannon Light and Fit Toasted Coconut Vanilla Greek Yogurt 1 Tbsp Semi-sweet Mini-Chocolate Chips |
Monday, April 15, 2019
Better Biskits (Biscuits)
I love "biskits." As a true Son of the South I'm pretty sure it's mandatory. If you search this blog you'll see ample evidence that I am in search of the true hand made Southern Flour biscuit of my youth. I've tried dozens of versions that were Bariatric Friendly - but not "Taste Bud Friendly" Those that were passable close I've included here - but I keep searching for :"The One"
I keep making slight changes and modifications in hopes of getting that crispy, chewy, taste explosion of the perfect biskit. Have I found it... Maybe...
This is the recipe I currently use - and it's close... REALLY close...
ALL ingredient MUST be at room temperature!
Ingredients
1½ Cups Almond Flour
¼ Teaspoons Salt
1 Tablespoon Baking Powder
2 Eggs
⅓ Cups Sour Cream
4 Tablespoons Butter (melted)
⅓ Cups Shredded Cheese (optional)
½ Teaspoons Garlic Powder
Instructions
Preheat your oven to 400°. Spray your pan. A baking spray that uses flour is best.
Also, these biscuits will spread when they cook so use a pan that has walls like a brownie or cupcake pan. Unless you like flat biscuits. I'm not judging.
Combine all of your dry ingredients. Using a fork will help break up some of the clumps in the almond flour.
Combine all of your wet ingredients and start mixing.
Looks like egg drop soup? Keep mixing.
Looks like you put too much butter in your mashed potatoes? Keep mixing.
You can stop mixing when it looks smooth - it takes a while
Pour your wet ingredients into your dry and start mixing. A silicone spoon is great for this.
This doesn't take much effort. The almond flour actually absorbs liquid faster than wheat flour.
Now let's dump the cheese in there! Mix well. Oiled hands work best.
Now start transferring to the pan a spoonful at a time.
It doesn't have to look perfect. Just try to keep the portions even-ish.
Bake for 10 to 12 minutes
Until they look GBD (Golden Brown and Delicious)!
It's going to blow your mind, the first time you try one.
I usually eat at least one straight out of the pan but then I go to work making breakfast sandwiches for the week.
Just assemble, bag and freeze.
Cook's Notes:
Use a shredded Monterrey Jack or Mozzarella for a plain biscuit. Use a strong sharp cheddar and a pinch of cayenne for that "Cheesy Biskit" flavor
Friday, April 12, 2019
Sausage and Egg Cups
The saying goes "He who fails to plan, plans to fail." And that is never more true than when it comes to meal planning for the post-bariatric lifestyle. If you're not taking the time to assure that you are staying on your eating plan, I can ASSURE you that you are not.
Thankfully, meal planning can be super simple - particularly with recipes like this one. Perfect breakfast for a crowd - or "plan-ahead" breakfasts for the week!
INGREDIENTS
2 lb. ground pork (or turkey) sausage
1 tsp. kosher salt
Freshly ground black pepper
2 1/2 c. chopped fresh spinach
1 c. shredded white cheddar
12 eggs
1 tbsp. freshly chopped chives or green onion (for garnish)
DIRECTIONS
- Heat oven to 400 F
- Divide sausage into 12 equal (approximately) balls
- Add a ball of sausage to each well in the muffin tin and press up the sides to create a cup.
- Divide spinach and cheese evenly between cups.
- Crack an egg on top of each cup and season with salt and pepper.
- Bake until eggs are set and sausage is cooked through, about 25 minutes.
- Garnish and serve.
Of course this recipe can be halved or even quartered for the smaller appetite.
I've made them with a pinch of thawed frozen spinach that I drained (squeezed) well and finely chopped
I HIGHLY recommend a silicone muffin tin as they are great for preparing a vast array of single portion oven meals.
I recommend you check the label for your sausage and avoid any with added sugars.
--OR -- you can make your own sausage from scratch
Parmesan Garlic Roasted Cauliflower

It took me 60 years to learn to love cauliflower. I just REALLY didn't like the taste. THEN.. I realized that it wasn't the taste of cauliflower that I hated, it was the LACK of taste that I hated! Once I began to think about cauliflower the same way I think about chicken, a carrier of ADDED flavors, my whole perspective changed. Since then, cauliflower has become a large part of my weekly meal planning. It's the perfect low carb side dish - different textures, different flavors, so it never gets boring.
Ingredients
1 large head cauliflower, trimmed into small florets
½ cup grated Parmesan cheese
1 tablespoon Italian Seasoning
3 cloves garlic, minced
3 tablespoons olive oil, more if needed
sea salt and black pepper, to taste
Instructions
Preheat the oven to 400°F.
In a large mixing bowl, combine the cauliflower, Parmesan cheese, Italian seasoning, garlic, olive oil, salt and pepper. Toss until all ingredients are well combined and the cauliflower is coated.
Line in a single layer, on a rimmed baking sheet and bake on the top rack for 30 to 40 minutes.
Cook's Notes:
Check your local restaurant supply store for "home quality" 1/2 size sheet pans. These are inexpensive and fit perfectly in the average home oven. They have become my primary cooking tool.
Along with them purchase a roll of parchment paper. A sheet on your sheet pans catches nearly all the crumbs and liquids making sure food doesn't stick and cleanup a snap.
Bacon Wrapped Jalapeno Popper Stuffed Chicken
Bacon Wrapped Jalapeno Popper Stuffed Chicken is the dinner that dreams are made of. Creamy and cheesy stuffed jalapenos are stuffed into juicy chicken breasts and then lovingly wrapped in salty bacon. Slow roasted for maximum flavor and basted with homemade BBQ sauce, this is a jalapeno popper like you’ve never had it before.

Start with a classic popper filling, softened cream cheese, medium cheddar cheese, and then add a twist with Sweet BBQ Rub. This adds a little smokiness and sweetness to the inside of the popper itself. Make sure your jalapenos are thoroughly cleaned of seeds and ribs to remove that excess spiciness. I like to split my jalapenos in half and scrape the seeds before stuffing with the filling and then pressing them back together.
Once your poppers are assembled, it’s time to get to the next step! Use a sharp knife to split your chicken breasts. I press down with one hand on top of the breasts and use the other hand with the knife parallel to the cutting board to slowly slice through the breast. Make sure you don’t cut all the way through, leave one side of the breast completely in tact so you can easily open and close the chicken.
Set the stuffed popper in the middle of the opened breast and then fold the top flap of the chicken over to envelop the popper completely. Next up, it’s time to wrap in bacon! I like to use a regular thickness of bacon on this chicken so the fat has time to render and crisp by the time to chicken is done cooking.
When the internal temperature of the jalapeno popper stuffed chicken reaches 150 degrees F, I like to baste with BBQ sauce. If you don’t want to take the time to make homemade sauce, you can always use your favorite store bought brand. Continue cooking until the internal temperature reaches 165 degrees F. I like to use an instant read thermometer.
ADAPTATIONS
I make my jalapeno popper stuffed chicken in my smoker, but if you don’t have one you can absolutely use an oven or a regular gas or charcoal grill. All you have to do is follow the same time and temperature guidelines in the written recipe below. In your oven, make sure the bacon fat has somewhere to go. I recommend cooking on a roasting rack above a baking sheet so the fat can drip down and not saturate the bottom of your chicken.
If you’re cooking these in a regular grill, the key is cooking the chicken on indirect heat. Turn on half of your burners and then cook the chicken on the half where the burners are off. The radiant heat will cook them without having do deal with the flare ups and grease fires from the bacon fat dripping down onto your coals or open flames.

Ingredients
- 4 boneless skinless chicken breasts
- 4 large jalapenos
- 4 oz cream cheese softened
- 4 oz medium cheddar cheese shredded
- 1 Tablespoon No Sugar Added BBQ Rub
- 12 pieces bacon
- 2 Tablespoons No Sugar Added BBQ Rub
- 1/2 cup No Sugar Added BBQ sauce
Instructions
Preheat your oven/grill/smoker to 250 F for indirect heat with mild wood like apple or hickory.
Prepare your poppers by slicing the tops off of the jalapenos, cutting them in half, and scraping out the ribs and seeds inside of the poppers.
In a small bowl, combine the cream cheese, cheddar cheese, and the 1 Tablespoon of sweet rub. Use the back of the spoon to press the filling mixture into each half of the cleaned out peppers and then press the pepper halves back together.
On a large cutting board, slice the chicken breasts open, without slicing all of the way through the breasts. Set one filled popper inside of each chicken breast and fold them closed.
Wrap each chicken breast with about 3 slices of bacon. Secure the bacon ends with toothpicks, if necessary. Season the stuffed chicken on all sides with more of the sweet rub.
Place the chicken breasts on the oven/grill/smoker, close the lid and cook until the internal temperature reaches 150 degrees F. This process usually takes an hour and a half. Baste the chicken liberally with BBQ sauce, close the door, and continue cooking until the internal temperature reaches 161 degrees F.
- Remove the chicken to a cutting board or serving platter and allow it to rest for about 10 minutes before slicing/serving. Enjoy!!
Cook's Notes:Use a spoon to scrape the veins and seeds out of the jalapenos.If you have sensitive hands, I recommend powder free medical examination gloves
- DO NOT TOUCH YOUR EYES if you prep peppers with bare hands
- I prefer thin bacon for the wrapper. The thick stuff takes too long to cook.
Subscribe to:
Posts (Atom)