Monday, December 19, 2016

Ham and Faux-tato Casserole

No Picture!  It disappeared too fast!

I bought a couple huge hams at a ridiculous sale price knowing that I could trim out the bones and break them down for several meals.  After I packaged the slices and the remaining sizable chunks for freezing, I had a lot of good meat in "scrap" sizes.  I remembered my grandmother used to make a Ham and Potato Casserole when I was young, so I decided I'd resurrect it as a Low Carb dinner treat - meaning...  no potatoes - but I've been doing this long enough to know that cauliflower is the PERFECT potato substitute for most recipes.

Cheesy, gooey, satisfying - this is a splendid recipe for that left-over Christmas Ham!  
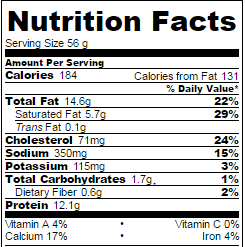
Serves 4

Ingredients


2-3 cups shredded cheddar cheese
1 pound cauliflower
1/2 medium onion, chopped 
4 ounces cream cheese (softened)
1/4 cup sour cream (or Greek yogurt)
1/4 cup heavy cream
1 large egg, beaten
1 cup diced ham
salt & pepper

Instructions

Preheat oven to 350ยบ F
Saute or microwave onion until tender.
Cook the cauliflower and drain it well.
Rough chop the cauliflower to match the ham dices
Grease an 8X8 casserole dish.
Mix 1 cup of the cheddar cheese with the remaining ingredients in the dish until well combined
Cover with remaining cheese.
Bake for 35-45 minutes until bubbly and browned.

Allow to sit for 5 to 10 minutes before serving

Cook's Notes:
  • I recommend a nice sharp cheddar, but use what you have on hand.
  • I prefer frozen cauliflower.  Just vent the one pound  bag and microwave on high for 6 minutes, flipping the bag half way through
  • Be sure to grease your casserole dish - unless, of course, you PREFER to spend the evening scraping cheese from it!
  • Want a crunchy top crust? Sprinkle liberally with grated Parmesan cheese before baking (the stuff in the green can works!)
  • If you've got a few strips of left-over bacon (yeah, right!) you can chop it into the mix as well.

Tuesday, November 1, 2016

'Twas the night before surgery


'Twas the night before surgery,
when all through my gut
not a morsel was stirring,
not even a nut.

The suitcase was packed
by the back door with care,
in hopes that a new me
would soon return there.

I lay nestled, all snug in my bed
while visions of calories
danced in my head;

And me in my plus size
pajamas and wrap,
had just settled in
for a long restless nap.

When deep in my mind
there arose such a clatter,
I sprang from my dreams
to see what was the matter.

Away to my fridge
I flew like a flash,
ripped open the door
and drooled at the stash.

The moonlight reflecting
off the beautiful snacks
gave a luster of radiance
to all on the racks.

When, what to my
wondering eyes should appear,
but an array of the comfort foods
I hold so dear.

With a familiar feeling
of all those I'd pick,
I thought in a moment
I just might be sick.

More lovely than angels
their voices they came,
and they whistled and shouted
and called me by name;

"Now pizza, now french fries,
now chocolate galore
on cheescake, on ice cream,
on doughnuts and more!"

From the tip of my tongue,
to the end of my toe,
I will miss you all more
than ever you'll know.

As an addict that shakes
and stirs as he sits,
I'll mourn the loss
of these delectable bits.

So back to my bed
I went with great haste,
and settled back down
with nary a taste.

And then in an instant,
in pre-op I sat,
nervously waiting
to no longer be fat.

As I sat deep in thought
and adjusted my gown,
in came my surgeon
in one single bound.

He was dressed all in scrubs,
from his head to his feet
and he seemed very calm
as he eyed me like meat.

He looked at my chart,
with his scope gave a listen;
I don't think he noticed
my eyes start to glisten.

He was chubby and plump
he could lose some himself,
and I laughed when I saw him
in spite of myself.

A wink of his eye
and a twist of his head,
soon gave me to know
I had nothing to dread.

He spoke barely a word
as he prepped for his work,
he paused for a moment,
then turned with a jerk.

And laying a finger
aside of his face,
and giving a nod,
from the room he did race.

He checked in the next day,
to his students gave a whistle,
and away they all flew
like a down of a thistle.

But I heard him exclaim
as he walked out of sight,
"speedy thinness to you
and a healthier life!"

Wednesday, September 14, 2016

Almond Thumbprint cookies


They have these cute little cookies with jam filled centers at my local grocer. I looked at them fondly as I walked by the display, then a magical word hit me "frangipane!!I" - it's a sweet almond paste that I can whip up with no trouble -and I bet it makes AWESOME cookies! That's a bet I won! Here's how you do it!


Makes about 30 cookies


Ingredients:
2 cups almond meal (or ground almonds)
2 large eggs
1/2 tsp almond (or vanilla) extract
2 tbsp flour
8 tbsp melted butter
2 cups Splenda Granular (or equivalent sweetener of choice)


Sugar Free Preserves (for centers)

  • In a large bowl, mix all the ingredients except the preserves/jelly, unril completely combined.
  • Wrap in plastic wrap
  • Chill completely - at least 1 hour in the refrigerator - preferably overnight
  • Preheat oven to 350 F
  • Form cookies.  I used a small cookie scoop for uniform size and pressed the balls out with a fork for the cross hatch design
  • Using your finger or thumb, make a depression in the middle of each cookie
  • Microwave a small quantity of preserves or jelly and use a spoon to drizzle into the depressions.
  • Bake at 350 10-14 minutes util bottoms and edges begin to brown
  • Allow to cool completely (if you can wait that long!)


Cook's Notes:
Store in a sealed container. Best if eaten within 3 days (that's how long until they were all gone at my house!)
I used Smucker's Sugar Free Strawberry Jelly, but the apricot and orange marmalade are equally delicious. Experiment!


Friday, August 26, 2016

Buttermilk Roasted Chicken

Without a doubt, the very best part of fried chicken is the battered, seasoned, gold-tinged and impossibly crispy exterior - too bad that it is a no-no for us to eat it. But, as far as I’m concerned, the tender chicken within is no distant second. My grandmother's southern fried chicken recipe had you soak the uncooked chicken in a brine of buttermilk and seasonings for at least a day, resulting in meat that was decadently tasty and tender long before it hit the cast iron frying pan. Why shouldn't we have that decadence without all the grease and carbs?

This is what I thought when I stumbled on an old recipe four weeks ago -- and for three of them, I sat at my desk staring at my computer screen, editing away. Dreaming mostly of the buttermilk chicken I would finally make when I was done. The recipe turned out to be a good place to start, but I wanted more — a longer soak, more salt, less oil, more garlic and, for some reason, I felt the recipe was itching for paprika. So, I went another round with it — finishing it with a drizzle of olive oil and sprinkle more of paprika and coarse salt before roasting it — and this, at last, was the buttermilk chicken I had dreamed about.

Despite the day-long soaking time — and trust me, the difference between a two-hour soak and a day-long one is TREMENDOUS. Tremendous enough that I implore you to hold out for it — this recipe is a cinch, and totally fits my other side project: getting a relatively hassle-free, wholesome dinner on the table as many nights a week as possible. It takes five minutes to throw together the buttermilk brine the evening before, and (with legs, at least) just 30 minutes to roast. In that time, you can toss a salad or roast another vegetable and later watch in awe as your family inhales this luscious chicken. Needless to say, I plan to make a habit of this recipe - and I think Granny would be proud.


Buttermilk Roast Chicken


Nutrition Facts
Serving Size 178g (about 6 oz)

Amount Per Serving
Calories 242
Total Fat 4.8g
Saturated Fat 1.4g
Cholesterol 117mg
Sodium 1280mg
Total Carbohydrates 2.1g
Sugars 1.1g
Protein 44.7g


2 cups buttermilk
5 garlic cloves, peeled and smashed
1 tablespoon table salt
1 tablespoon granulated Splenda
1 1/2 teaspoons paprika, plus extra for sprinkling (I used Hungarian, a smoked one would also be delicious)
Lots of freshly ground black pepper
1 tablespoon of your favorite hot sauce (or to taste)
2 pounds chicken parts (I prefer dark meat)
Drizzle of olive oil
Flaked or coarse salt, to finish

Whisk buttermilk with garlic, table salt, Splenda, hot sauce, paprika and lots of freshly ground black pepper in a bowl. Place chicken parts in a gallon-sized freezer bag (or lidded container) and pour buttermilk brine over them, then swish it around so that all parts are covered. Refrigerate for at least 2 but preferably 24 and up to 48 hours. More is BETTER!

When ready to roast, preheat oven to 425 degrees.
Line a baking dish with foil (not absolutely necessary, but I never mind having a dish that cleans up easily).
Remove chicken from buttermilk brine and arrange in dish.
Drizzle lightly with olive oil, then sprinkle with additional paprika and sea salt to taste.
Roast for 30 minutes (for legs, thighs and wings; approximately 35 to 40 for breasts), until brown and a bit scorched in spots.

Serve immediately.

Cook's Notes:
 

  • This same method works remarkably well with thick sliced pork loin or pork chops

Friday, August 5, 2016

Bacon Poblano Chicken Rollups

You take a bite and crunch through the crispy bacon coating to find a smoked paprika and cumin rub on the outside of a succulent tender chicken breast, with a fire-roasted poblano and cream cheese mixture rolled inside. Spicy, smoky, creamy, rich perfection with a super low carb count.

SCORE!!!!!!!!!!!!!!!!!


I'm going to assume that you know how to butterfly a chicken breast - if not you can substitute pre-sliced chicken (or turkey) cutlets from your grocer's meat case.


To roast the poblano peppers, place the poblano on a fork and hold over a gas flame until it is blistered and blacked all over. If you don’t have a gas stove you can do the same thing with a plumber’s torch. They are super cheap at the hardware store and last much longer than the fancy-schmancy ones at cooking stores. You can also broil it but you’ll need to watch it carefully. You want it to blister not to ignite!


Ingredients


3 Boneless chicken breasts, butterflied and cut to make 6
2 Poblano peppers
6 tablespoons of cream cheese (at room temperature)
3 tablespoons finely grated cheddar cheese
6 slices of bacon


Rub

1 tablespoon smoked paprika
1 teaspoon of cumin
1/2 teaspoon of chipotle powder
1/2 teaspoon of Kosher salt
1/4 teaspoon of garlic
Pinch of sugar free sweetener if desired

Instructions

Prep
Preheat your oven to 350 F
Pound the chicken breasts between 2 pieces of parchment until they are thin - Set aside.
Blacken the poblano pepper over an open flame until the skin blisters and peels.
Place inside a plastic bag and seal. Allow to cool.
Rub the blistered skin off.
Slice in 6 slices - Set aside.
Mix the cream cheese and cheddar - Set aside.

Assembly
Lay one of the chicken breasts out on parchment paper.
Lay a slice of poblano on the top.
Spoon a little of the cream cheese mixture on top.
Roll up carefully.
Sprinkle or rub liberally with the spice mixture.
Wrap the bacon around the rolled chicken breast. It should stick -  but if it doesn't secure it with a toothpick.
Repeat with the rest of the ingredients.

Bake
Bake at 350F for about 20 minutes, or until chicken registers 160F on a meat thermometer.
Let stand 5 minutes.

Remove toothpicks before serving

Why I Can't Support Premier Protein Shakes


hero

At virtually every bariatric support group meeting that I attend, there is a discussion about Premier Protein Shakes and how everyone "just loves them." I'm neither a doctor nor a nutritionist, but a long time ago I was taught to read the labels for a look at what was TRULY inside the product I was about to consume - PARTICULARLY my protein. I don't think anyone is doing that anymore. I sit quietly (VERY difficult for me!!) and think, "Well, at least they are getting SOME protein"

But that's not my job. I'm an influencer in those groups and I have a responsibility to be careful about what I endorse - and silence IS an endorsement. So I'm speaking out so you are aware that what we are (silently) endorsing may NOT be the "premier" product everyone thinks it is.


Below is the Nutrition Label from a Premier Protein Chocolate Shake.  Notice the circled INGREDIENTS section in the upper right corner


It case it's not legible, or no longer attached,  it reads:

INGREDIENTS: Water, PREMIER 
NUTRITION PROTEIN BLEND (Milk Protein
 [Milk Protein Concentrate, Milk Protein
Isolate], Calcium Caseinate, Whey Protein 
Concentrate) 

Then on to other items,,

No where on that label does it say "100% Whey Isolate, "  and the only mention of whey is "Whey Concentrate", which is an inferior product.  You can go here to see the difference.  The label may say "30 Grams of Protein", but for the bariatric patient something less than 6 grams of that can actually be absorbed.


There are numerous sites on the internet that compare the kinds of protein, but one thing is always clear, 100% whey isolate protein is ALWAYS the easiest and fastest to digest - and when you are dealing with a malabsorptive gastrointestinal system, you want something that dissolves into your system quickly and easily. .

I selected Premier as an example because it's SO visible in our group, but the same is true for ANY food product, medicine or vitamin that you rely on to maintain your health.  You HAVE to know what is going into your body is the best thing for it.  We all stumble, but we should never be fooled.

---dave---

Thursday, August 4, 2016

Almond Pudding Cake

Cake....  Uhmmmmm..  Luscious soft vanilla cake, still warm from the oven, covered in fresh berries and a dollop of REAL whipped cream with a mint sprig on top.  Can't you just smell the wonderfulness of it?

That WAS the picture I was going to post here, but the cake disappeared before I could get the camera set up!

This is good.  This is REALLY good.  This is now my go-to Bariatric Birthday Cake

8.7 Grams Protein
2.7 Grams Effective Carbs

Preheat oven to 350 F

1 cup butter, softened
1 cup Splenda Granular
5 eggs, large
2 cups almond flour
1 small pkg Sugar Free Vanilla pudding mix
1 teaspoon baking powder

2 tsp vanilla extract

Have ALL ingredients and utensils at room temperature!!

In your mixer bowl, cream the butter and Splenda until it is fluffy and turns light yellow. 
Add eggs - one at a time - completely incorporating each before the next. 
Whisk almond flour and SF pudding mix with baking powder in another bowl
Add dry mix to wet mixture a little at a time while beating. 
Add vanilla extract and stir well

Scrape into greased 9"-10" Springform pan (or 9" round cake pan) 
Bake at 350 degrees F for 50-55 minutes until toothpick inserted near the middle comes out clean.

Allow to cool - some..  Slice and serve

Cook's Notes:
This is a great base for any flavor cake.  
  • Substitute lemon extract for half the vanilla extract and use lemon pudding - Lemon Cake!
  • Poke it full of holes and pour hot SF Lemon Jell-0 over the top!
  • Toss in a handful of chopped pistachios (or any nut) and a package of SF pistachio pudding mix (and few drops of green food coloring for effect)
More ideas?  Post them in the comments below!

Chicago Deep Dish Pizza Quiche

I repost this occasionally because new readers freak at the thought of giving up pizza and no one will scroll all the way back to the original post..  
Do you want the heft/flavor of a great Chicago Deep Dish pizza, but avoid the carbs? Try this DELICIOUS carb-haters version

http://ic2.pbase.com/t3/25/285225/4/121603315.Rwi0uLMt.jpg

Nutritional Values (not including toppings)

Calories 238
Total Fat 17.9g
Saturated Fat 10.7g
Cholesterol 118mg
Sodium 367mg
Total Carbohydrates 3.6g
Sugars 0.8g
Protein 15.7g


Quiche Crust
4 oz cream cheese
3 eggs
1/4 cup Parmesan cheese
1/3 cup heavy cream
1/2 teaspoon oregano
3 cups shredded mozzarella
1 teaspoon garlic powder
1/4 cup low sugar pizza sauce
Whatever pizza toppings you like

Beat cream cheese and eggs until smooth.
Add heavy cream, Parmesan and spices. Mix well.
Spray 13x9 pan with Pam
Place 2 cups shredded mozzarella in pan and mix in the egg mixture
Bake at 375F for 30-40 min then cool for 5 minutes.

Toppings
Spread with sauce and sprinkle on remaining mozzarella
Add toppings 
Bake an additional 10 min in 375F oven.

Serves 8

Cooks Note: Additional toppings could include, pepperoni, cooked Italian sausage crumbles, steamed or blanched bell pepper slices, pepperoncini, deli ham, sauteed onions and/or mushrooms - thinly sliced, artichoke hearts, green and/or black olives, etc...

Make a 1/2 recipe in an 8X8 pan to serve a family of 4

Wednesday, August 3, 2016

Dirty Quinoa

In traveling for my job I spent some time (not NEARLY ENOUGH) in the great state of Louisiana, between the cities of "Nawlins" and "Baton Rouge"  - and yes, I pronounce it with the Cajun/French accent. The food there is heavenly, but it's a very "rice enhanced" diet.  To have ร‰touffรฉe or Jambalaya without a scoop of rice is sacrilege!  But my craving was for real "dirty rice"..  The kind you get a spicy, meaty pile of on your plate in the "meat and 3" you stopped in on the side of the road as you wander through the lowland on your daily excursions.

Of course, I'm not going to ask you to eat carby rice, so I go to my favorite "rice replacement", protein rich quinoa. (pronounced KEEN-wa)

There are those of you who are probably not chicken livers fans.  The original recipes that I fell in love with all feature them - BUT...  you can double up on the sausage if you choose to give the livers a pass.

This recipe makes a LOT! - but it refrigertes and freezes well

1 lb chicken livers, finely chopped
1 lb tube GOOD pork sausage
3 tbsp vegetable oil
1 cup onion, finely chopped
1/2 cup celery, finely chopped
1/2 cup green and/or red bell pepper, finely chopped
1 tsp crushed red pepper (to taste)

4 cups cooked quinoa 


Cook the quinoa by package directions.  I recommend cooking it in a good rich chicken or vegetable stock to add flavor.

Cook the sausage and chicken livers in a large skillet with 2 tbsp vegetable oil until browned - 8 to 10 minutes. 
Add the remaining oil and the vegetables and sautรฉ until soft. 
Gently fold in crushed red pepper and the quinoa. 
Cook for 1 to 2 minutes to heat through.

Season to taste with salt and pepper

Cook's Notes:

  • If you opted out of the chicken livers you can use 2 pounds of bulk sausage - mild or spicy as matches your taste - you can even use ground beef if you want, but you'll miss out on that "porky goodness."
  • Parsley..  I'm not a fan of parsley as I grew up with it being a plate decoration in cheap diners, but you can add a 1/4 cup finely chopped parsley at the end if you so desire.
  • Crushed red pepper is optional.  I use a mild pork sausage and kick it up with the pepper - but if you yours on the "mild side", by all means use less - or none at all.
  • Cauliflower makes another great rice substitution.  You can get directions in my Cauliflower Rice Pudding recipe.


Questions?  You can always reach me via the Comments section or email me

Sunday, June 19, 2016

English Muffins


Dark toasted muffin with a smear of fresh
whipped country butter and a
cross section to show texture
Yes..  It's true..  I've been obsessed with bread recently.  You see..  I've slipped..  I've let   carbs come sliding back into my diet, into my pouch and they are taking up residence around my waist - and it's ALL the fault of that demon, BREAD!!!  Life and work have been hectic and I've taken to allowing myself to make a quick sandwich at lunch and grabbing something takeout (and wrapped in bread) for dinner.  Well...  NO MORE!!!

Today we're going to make a wonderful, fluffy English Muffin with the texture and flavor of a rich dense whole wheat bread.  I made mine in a small cereal bowl (since I have no OTHER use for them!) so it had the right shape to be used as a muffin or a bun.  You can use something with straight sides if you like - perhaps an 8 oz ramekin.

Toasted, it reminds me a of an English muffin or bagel.  Untoasted, it's the perfect platform for the BLT with extra mayo I've been craving!!


Ingredients

2 tbsp unsweetened cashew, almond or peanut butter
1 tbsp butter (or coconut oil)
2 tbsp almond flour
1/8 tsp salt (scant pinch)
1/2 tsp baking powder

1 tsp Buttermilk Blend (optional - see notes)
1 tbsp milk (cow, soy, almond, moose... whatever)
1 egg, beaten


Instructions


Spray the bowl you are using with cooking spray or rub well with oil.

Add the nut butter and butter to a microwave safe dish.  Microwave for 30 seconds and mix until smooth. Set aside to cool.

In another small bowl whisk the almond flour, salt and baking powder together.

Add the nut butter mixture, milk and egg into the dry ingredients and stir until combined.

Pour this mixture into the oiled bowl.


Microwave on high for 2 minutes.


Allow to cool a few minutes before taking
it out of the bowl


Slice in half to toast.


Toast as desired desired.
YES!!  I like mine DARK!


Cook's Notes:

  • The "Buttermilk Blend" mentioned above is a dried buttermilk powder, available on the baking aisle in almost any market.  It adds a hint of that buttermilk "twang" to the flavor, but more importantly, it adds a bit of "lift" and lightens the texture.  I made one without it originally and found it a little too dense for my taste.  If you want to make one without the Buttermilk Blend, you might consider adding another 1/4 tsp of baking powder to the mix.
  • Try adding a small quantity of sunflower kernels and/or flax seeds or other seeds and ground nuts to the mixture
  • Add your favorite sweetener and a pinch of cinnamon - stir in some raisins - have a ball!


Friday, June 17, 2016

Bread Sticks


I hear it from every reader and at every support group meeting. "I miss BREAD!" - there's really no need for that, with these delicious bread sticks. They go great with a meal – or 
make a great  snack.  For those times when you’re craving something salty, cheesy, crisp on the outside and soft in the middle.

This recipe makes a LOT of product, so it’s best to separate it into fourths, and bake about 1/4 of the dough at a time. The rest will keep in the refrigerator for a LONG time (not that mine lasts that long in there before use...) and you can cook up fresh low carb bread products as needed.

Ingredients

1 8 ounce bag good quality shredded Parmesan cheese
1 cup almond meal (flour)
1 large (or 2 small) egg(s)
2 Tablespoons melted butter
Optional: granulated garlic to taste

Preheat oven to 350 F
Mix ingredients well and chill. 

Roll small portions into a ball and then form into cheese sticks. 
Bake on parchment lined sheet pan for 10 minutes, turning after 5 minutes or as necessary.

Cook's Notes:

  • I make my bread sticks flat on top so I can turn them over to to get crisp and brown on both sides
  • Make one "bread stick" the size of a bread slice or bun, then cut it open and stuff with sandwich fixings, like ciabatta or focaccia!
  • Make it larger and use it for a pizza crust!
  • Every oven is different, so your cooking time may vary.  Watch them!  They smell AWFUL if they burn!  

Sour Cream and Chive Crackers

I've gone herb crazy this spring.  I decided to attempt to grown my own and get away from the expensive little bundles in the local market.  Starting with single pots of parsley, basil, rosemary, thyme and chives (Sounds oddly like a Simon and Garfunkel song...) I have been rooting and replanting cuttings and now have several large urns, full of herbs, sitting by the railing on my sunny back deck.  One of them is FULL of chives, and requires daily pruning.  Trust me..  fresh chives, or any herbs, in scrambled eggs is a delicious way to start your day!

Chives and Sour Cream Crackers; Pile of Crackers, Cream Cheese in the Background | Low-Carb, So Simple!

But today it's about ANOTHER craving..  CRUNCH!  I want some CRUNCH!  And although pork rinds go a LONG way towards satisfying that need, some real CRACKERS would be delicious.

Ingredients

2 cups almond flour
A hand full of fresh chives
2.5 oz sour cream
1 tsp (or to taste) salt
1/2 tsp garlic powder


Instructions


Preheat the oven to 250 °F (low oven to cook them slowly)

Chop the chives into small pieces.
In a medium bowl, mix all the ingredients by hand. 
Knead for about 30 seconds or until smooth.

Place the dough on a baking sheet lined with parchment paper. 
Place another parchment paper on the dough. 
Using a rolling pin, roll the dough between the two parchment papers as thin as you can.

Remove the topmost parchment paper.

Cut the dough with a knife or pizza cutter into squares (or your favorite shapes)

Bake for 50–60 minutes. Check frequently so that the crackers don’t get too dark or burn.


Cool completely and break into squares.


Cook's Notes:

  • This is a simple dough, made from almond flour and sour cream.  All the other ingredients are simply for flavor.  If you don't have an urn full of chives on your deck, you can use taco seasoning..  or the powder out of those blue mac&cheese boxes..  or basil and sundried tomato...  Your imagination is your only boundary!
  • The edges MIGHT be thinner and cook faster, so be prepared to remove them while the middle continues to bake.  Rolling pin skills come in handy.

Tuesday, June 14, 2016

Prosciutto Wrapped Egg Rolls

Egg Rolls!  EVERYBODY loves them!  They are also perfect for emptying out those leftover containers in the fridge at the end of the week.  The downside is that they are high in carbs from the wanton wrappers and it's just a greasy mess to try to deep fry them.

SO....  What if we remove those 2 obstacles and give you a crispy MEAT WRAPPED egg roll?!?

The ingredients below are suggestions - you can toss in leftover green beans, pickles (kidding!) or anything that you find in the back of the fridge that doesn't have blue or green fur on it..  They'll come out great!  And you'll have "dinner in the palm of your hand."

Yield: 16 egg rolls

Ingredients

2 cups grated carrots
1 can (14 ounces) bean sprouts, drained
1/2 cup chopped water chestnuts
1/2 cup sliced green cabbage
1/4 cup chopped green onions
1 garlic clove, minced
2 cups finely diced cooked chicken (and/or pork)
4 teaspoons cornstarch
1 tablespoon water
1 tablespoon soy sauce
1 teaspoon canola oil
Pinch cayenne pepper
16 wrapper sized slices prosciutto
Cooking spray


Directions

Coat a large skillet with cooking spray; add carrots, bean sprouts, water chestnuts, cabbage, onions and garlic. 
Cook and stir over medium heat until vegetables are crisp-tender, about 3 minutes. 
Add meat; heat through.
In a small bowl, combine the cornstarch, water, soy sauce, oil and cayenne until smooth; stir into meat mixture. 
Bring to a boil. 
Cook and stir for 2 minutes or until thickened. 
Remove from the heat and allow to cool a bit before handling.
Spoon 1/4 cup meat mixture on the bottom third of one prosciutto slice; fold sides toward center and roll tightly. Repeat.

Spritz tops of egg rolls with cooking spray. Bake at 400° F for 10-15 minutes or until browned and crispy. (May vary depending on your oven.

Cook's Notes:
  • Tell your deli counter attendant to slice the prosciutto thick enough to hold together for rolling, not "see through".  They will understand. 
  • You can freeze cooled egg rolls in a freezer container, separating layers with waxed paper. To use, reheat rolls on a baking sheet in a preheated 350° oven until crisp and heated through. 

Friday, June 10, 2016

Three Cheese Breakfast Puffs


I love cheese. Sometimes I just need cheese. Did you notice that this recipe has three cheeses? Oh yeah!  THREE CHEESES!!!  These little breakfast puffs are almost like little cheese souffles. They are puffy and light. Simple to put together and fun to eat. 

Breakfast or snacks for 2

Ingredients

4 large eggs
1/4 cup cottage cheese
1/4 cup Parmesan cheese
2 oz shredded sharp cheddar cheese

Preheat oven to 350 F


Beat the eggs. 

Stir in the cheeses. 
Spray mini muffin tins or silicon cups with oil. 
Fill each cup a little higher than you would with a cake batter. 
Bake for 15-20 minutes. They will puff up and turn golden on top. 

Let the puffs cool 5 minutes before removing from cups. 
They will fall just a bit with cooling.

16 mini puffs: less than 1 carb per puff


Cook's Notes:

  • I didn't add a lot of other flavors to these because I wanted to really taste the cheese. That, I got. i can't help thinking that a few green chilies would be nice - or crumbled bacon - or sausage - or shredded ham - or <insert imagination here>  .
  • The cottage cheese makes the texture light. It makes scrambled eggs all tender and yummy too. 
  • The Parmesan cheese is the kind in the green can. I love fresh but this is a staple in my kitchen. It adds flavor and body to the eggs.
  • They are even good leftover and cold. They don't deflate, so go ahead and make a batch for your brown bag/road trip/picnic. They will travel well.

Wednesday, June 8, 2016

Cauliflower Hash Brown Muffin Cups

I love muffin-tin dishes.  They are handy for storing and having a grab-n-go meal when you need one. Here's a low-carb twist for breakfast. After using cauliflower as a stand-in for pizza crust and rice pudding, I had to try it as faux-hash browns. Turns out, it's pretty TASTY!!

Ingredients

2 heads of cauliflower, trimmed, stemmed and chopped
2 cups shredded Cheddar cheese
1 dozen + 2 large eggs
1 tsp garlic powder
1 tsp garlic powder
1 tsp salt
Fresh ground pepper to taste
Chives, chopped (optional)

4 strips bacon - fried crisp

Instructions


Preheat oven to 375° F. 

Lightly grease a 12-cup muffin tin and set aside.

Bring large pot of water to a rolling boil

Add chopped cauliflower

Blanch for 3 minutes
Drop the blanched cauliflower into the bowl of a food processor and pulse until they start to resemble a fine grain.

Pour the ground cauliflower onto paper or cloth kitchen towels and twist to wring out excess liquid. Do this up to three times until the cauliflower comes out completely dry.
Transfer dry cauliflower to a large mixing bowl. Add cheddar cheese, garlic powder, salt and two eggs and stir to combine.
Distribute the mixture evenly throughout the muffin tins and use your fingers to press the mixture into the sides and bottom of each cup to form the nests.
Bake the nests for 15-17 minutes until brown.
Add a couple bits of bacon to the bottom of each cup and crack an egg on top, without breaking the yolk.
Bake for 7-8 minutes.
Sprinkle with chives and pepper to taste.

Cook's Notes:
A food processor is a crucial for getting that hash brown texture, but a powerful blender could work too. Once your cauliflower is pulsed to bits it's imperative that you remove ALL of the liquid. 

From there, you're just forming a dough with eggs and cheddar cheese (and a little garlic powder, salt and pepper, to give it more of a potato-like flavor). Your fingers are really your best tool when it comes to incorporating here, so roll up your sleeves and get that "dough" mixed and molded. A shot glass works well for molding the nests too

Be sure to pre-bake the nests before adding the eggs and other toppings. But really, treat this cauliflower concoction as "dough" because you can essentially put anything you want inside. We chose bacon and chives but anything you like in a savory egg dish would work: avocado, tomatoes, spinach, kale—you name it! 

Shrimp Lo Mein ala Zoodle

I am ON the Zoodles (zucchini noodles) bandwagon.  All those high carb pasta dishes I've been shunning for years are now not only accessible, but even more delicious than I remember!  Mostly because there is no gummy, funky pasta - and they cook quickly with no giant cauldrons of boiling water!


If you love takeout lo mein, try it with zoodles instead. You will NOT be sorry!

2-3 post-op portions

Ingredients


1 large garlic clove

1 Tbsp vegetable or peanut oil
1 large (or 2 small) zucchini cut into thick spaghetti shaped zoodles
3 oz carrots - cut in 
matchsticks
1/2 cup shelled edamame
2 tsp sesame oil
2 Tbsp soy sauce (I recommend 
low-sodium)
1/2 Tbsp hot sauce (optional)
8 - 10 large shrimp - shelled and deveined

2 Tbsp chopped scallions
1 tsp corn starch (optional)
1 tsp whole sesame seeds (optional)


Instructions

Set your wok over medium-high heat and allow it to get very hot. 

Splash in oil and swirl to coat 
Old Chinese saying: "Hot wok, cold oil, food won't stick!"


Add garlic clove and cook until garlic flavors the oil and is browned on all sides. Remove.  DO NOT BURN.

Add zoodles, carrots and edamame, along with sesame oil, soy sauce, shrimp and 
hot sauce (if using).

Stir corn starch into a few tsp cold water to dissolve and pour over mixture. (this step is optional, but I like the sauce to cling to everything.)

Toss with tongs for approximately two minutes until heated through. 


Garnish with scallions and/or sesame seeds.

Cook's Notes:
  • Of course, you are not limited to shrimp.  You can easily substitute (or add) lobster (for you rich and famous folk) or leftover shredded pork - or beef - and/or chicken - use them ALL for "House Lo Mein".
  • Add broccoli florets or snow peas - or frozen green peas to green it up even more. 
  • Color variations: 1 small green zucchini and 1 small yellow squash
  • I like some thin sliced onion petals in mine too!

Inside Out Sausage "Biscuits"

 “Crisp” on the outside and “fluffy” on the inside.


I know it’s rude to talk with your mouth full, and greasy fingers aren’t so great for my keyboard, but I just had to share this delicious recipe with you for inside out sausage biscuits!

It only takes about 10 minutes to whip up and toss in the oven. The “dough” keeps well in the refrigerator if you want to cook a few fresh at a time, but the biscuits keep well too so I tend to cook plenty so I have something to “grab and go” on hand.  And they heat/crisp up nicely in a toaster oven.

You can try different variations or use different cheeses. I’ve tried Cheddar or Colby Jack shredded cheeses (mixed half/half with the Parmesan) in the recipe for example, which was delicious too!

This is considered a “half batch” so you can easily halve it again for a smaller batch, or double it for a larger batch.

As is, this recipe makes 8 biscuits, each about 1.3 net carbs

Ingredients: 


1/2 cup Almond Meal/Flour
2 Large Eggs
1 Tbsp Butter, Melted
8oz raw good quality sausage (half a tube)
6oz bag finely shredded Parmesan cheese

Instructions:


This recipe makes about 10 inside out sausage biscuits.

Note: Now is a good time to preheat your oven to 350 degrees and place parchment paper on a baking sheet. Your hands will be too icky in a second. 

Melt the butter in the microwave
Stir the two eggs together
Combine all of the ingredients in a large bowl.

Mix all the ingredients together with my hands, similar to the way you would make a meatloaf: by kneading all the ingredients through your fingers until the ingredients are evenly mixed. Yes it’s cold and squishy!  Your fingers are your best kitchen utensil.

Patty out the dough into palm sized “biscuits” and place them on a parchment paper lined baking sheet. 

Bake at 350 degrees until done, with a nice browned crisp texture on the outside. They may take 15-20 minutes to cook, or a little longer depending on your oven and how thick you make them.  One thick batch went 45 minutes.

Just keep an eye on them, flip them halfway through to brown on both sides, and take them out when they are browned to your liking.

Cook's Notes:

  • Remove from baking sheet when done and place on paper towels to soak up any excess grease.  
  • Delicious warm, cold or at room temperature! 
  • Works well substituting 1 cup of precooked sausage crumbles.
  • Kick them up with a little crushed red pepper.
  • Tasty with Italian sausage for that fennel bite.
  • Toss in some cheddar cheese and form into balls for a favorite snack bite, sausage balls!

Melon Sorbet

It's that time of year for fireflies and June bugs - and sitting outside on the porch after dinner in the cool of the evening to enjoy a bite of something sweet.  What?  You had that surgery where you can't eat anything sweet?  P-shaw!  You haven't been paying attention!!

I am a melon junkie.  A ripe honeydew, a sweet cantaloupe or a luscious watermelon can take my breath away, so why not make them into a simple sorbet that you can enjoy at your leisure?


I found a perfect honeydew at the local market, but you can use virtually any melon in the same way.

Ingredients

1 melon  (adjust watermelon proportionately!!)
1 Tbsp lemon juice
up to 1/2 cup (sugar equivalent) artificial sweetener - depending on the sweetness of the melon
1/4 cup water
pinch (1/8 tsp) salt (optional)

Instructions

Peel and chop melon into bite sized pieces
Arrange loosely on a parchment covered sheet pan and freeze 4 to 5 hours until solid.
Add frozen melon to bowl of food processor
Add lemon juice, water, salt and sweetener
Process until smooth

Pour the pureed melon mixture into a freezer proof container (I used a lined metal loaf pan) and return to the freezer for at least 1 hour. Cover for longer storage.

Scoop up and serve!

If you prefer your fruit on a stick, pour the puree into Popsicle molds before you refreeze
Image result for picture honeydew sorbet


Cook's Notes:

  • This recipe works with most melons, berries and fresh fruits! 
  • You can make your sorbet more "elegant" by bringing the water to a boil and steeping finely chopped mint, basil or thyme leaves in it before adding to the food processor.
  • The salt is a "Southern Thing" - we put it on melon down here to enhance the inherent sweetness - yes, it's weird - but Southern cooks know a LOT about FLAVOR 

Have a great summer and CHILL!